In this past article , we learned how to create our 1st AWS Lambda service through using Serverless framework. Our current Function in the project, currently exposing GET HTTP verb and when it is invoked, it returns a list of harcoded blog objects. In this arcitle, we are going to extends its capability, by refactoring this part, to not returning hardcoded array. Instead, we are going to return an array of objects where are stored in AWS Data Storage service.
DynamoDB vs SimpleDB vs RDS (Relational Database Service)
AWS offers 3 Database Services to customers as follows: DynamoDB (a NoSQL database solution) , RDS ( Relational Database service, hosted & handled by AWS) and SimpleDB ( a similar NoSQL database to DynamoDB, yet AWS seems `hide` it from customers, but it’s accessible ). Among of these 3 options, I rule out RDS, because its pricing is the most expensive compared to the others (https://aws.amazon.com/rds/pricing/).
Initialise blog table on AWS DynamoDB
- Open Blog project’s serverless.yml file and then add these resources entries.
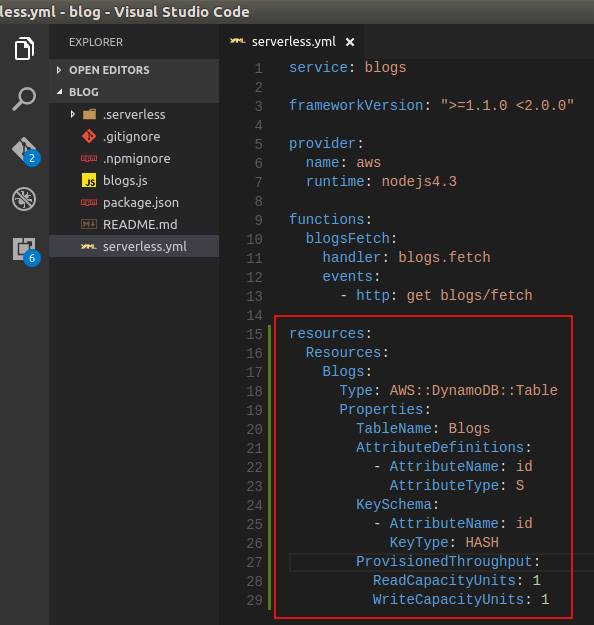
The resources section we added in serverless.yml file in there, is a way of telling serverless for creating a new DynamoDB table on AWS. In the section we define the table’s name, a String typed Attribute that we defined as the Primary key for this table and initial Read & Write Capacity units of the table. As for other attributes, we will add them when we are going to create records later.
- Once we have saved the changes in serverless.yml file, let’s go back to command terminal and invoke serverless deploy command for deploying the service. You may want to remove prior deployed service by running serverless remove command 1st.

- Now we are going to check the created table and add records on it. Let’s login into AWS Web Console using your Account and look for DynamoDB home page.
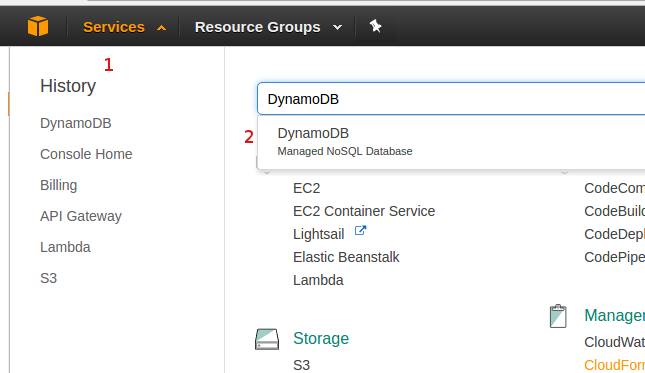
- Go to DynamoDB Tables’s page. Confirm that you notice the Blogs table appear on screen. Select it and then click Items tab.

- On the Items tab view, click Create item button and confirm that a modal dialog as in this following screenshot appears.


- Through accessing the popup menu, add 3 more attributes (columns) and fill them with strings as their values.

- As for the id, we are going to assign it with UUID. To generate the UUID, we can use available tool such as in this site.

- Repeat prior steps to add as many records as you want. You could go to Actions menu -> click Duplicate button for doing this.

Setup AWS SDK for Node.JS
AWS provides SDK for developer which contains various APIs for accessing their services, including DynamoDB. We need to use the SDK for Node.JS in our Lambda function for accessing the DynamoDB Table we created in previously.
- In the lambda project, ensure that it has package.json file. Otherwise, we will need to create it through running npm init command.


- Once we have finished prior step, we’ll install the AWS SDK inside our project through running npm install aws-sdk –save command. The extra –save argument on the command will add an entry in the package.json file, to ensure that when CloudFormation building our lambda, and run npm install command, npm would install the AWS SDK library into this project.


- Ensure that you have setup your IAM account’s Access & Secret Keys. If you are not sure with this, open ~/.aws/credentials file and ensure that there are lines which define these keys entries. If not, follow guide in this site.

Refactor Blogs resource’s GET verb – Phase 1
As we have done in prior article, we created retrieveBlogs helper method which returns a list of hardcoded blog objects. We are going to create a new method for replacing this retrieveBlog method. Here is the steps of how we are going to do this.
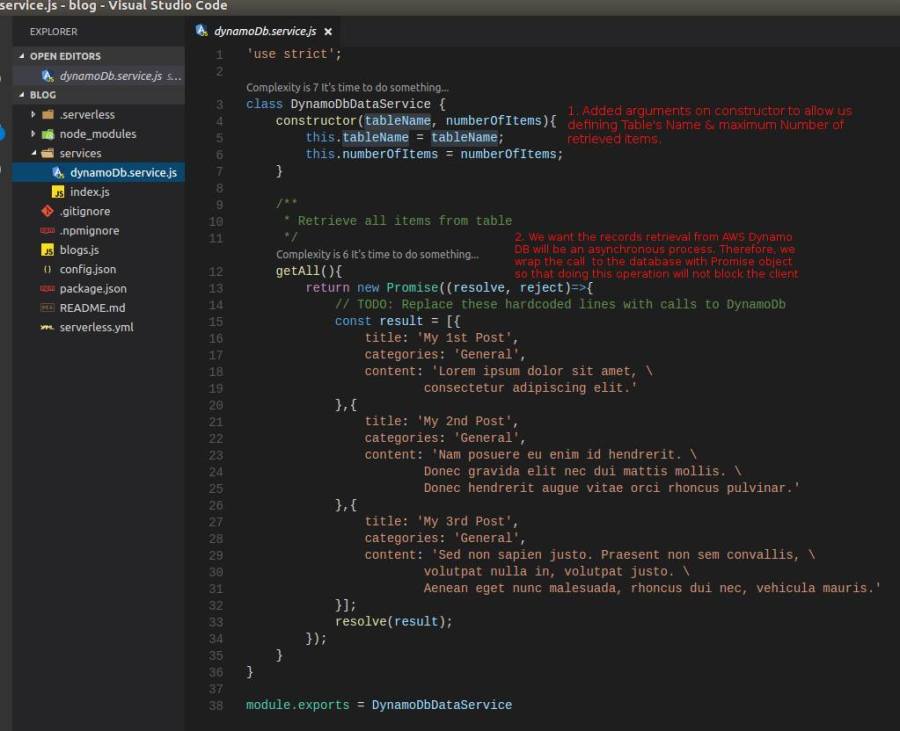
- Remove the retrieveBlogs method from handler JS file. Move the removed method’s hardcoded lines into a class, we name it as DynamoDbDataService class. Change the handler JS file to instantiate the new class and call its getAll method.
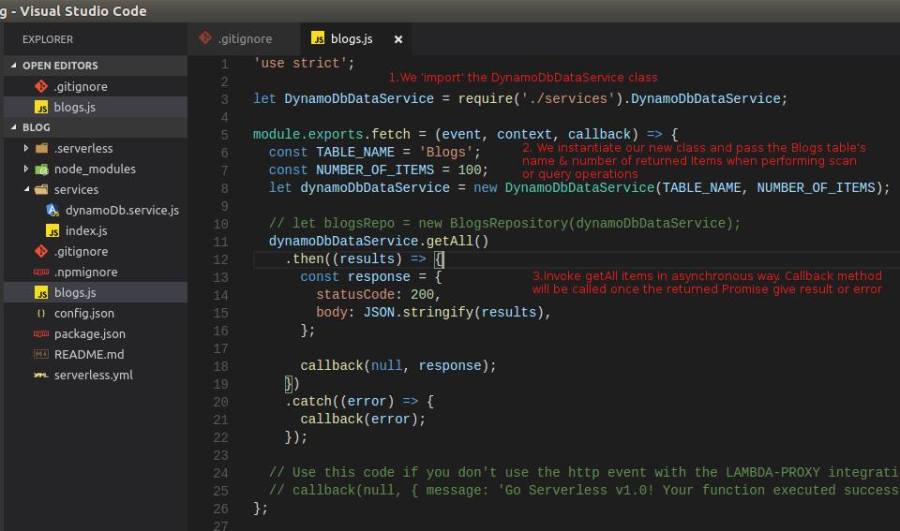
- Then, in the Handler JS file, we change the code by importing our new class, instantiate & initialise the new class and call its getAll method for retrieving the Blogs items from AWS DynamoDB.
- Before we move to next refactoring phase, we’ll invoke serverless invoke local command 1st to ensure that there are no errors in our new code.

Implement calls to AWS DynamoDB using AWS-SDK
- Let’s go back to DynamoDbDataService class. On the early lines (below ‘use strict’ line), we’ll put a statement to import AWS-SDK library.

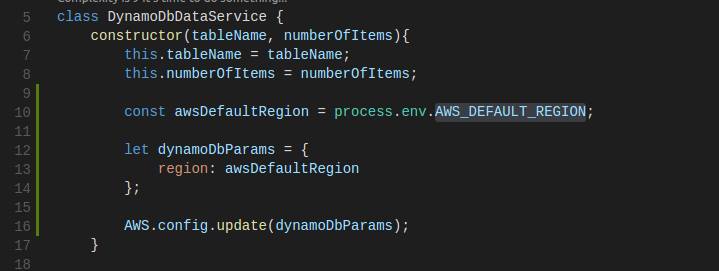
- Moving to the constructor part, we write lines to initialise the AWS’s configuration property. We want to tell AWS SDK which AWS Region that our Lambda Service is deployed to. We could hardcode it to a specific region such as us-east-1, ap-southeast-1 , etc. But, we won’t do this way. Because we don’t want to change this line in the future if we want to deploy the Service to different region.
AWS has provided an environment variable AWS_DEFAULT_REGION which filled with correct AWS Region of where our Lambda service deployed to, in the cloud environment. Therefore, we are going to get the AWS Region from AWS_DEFAULT_REGION environment variable, instead of hardcoded it.
- Removed all hardcoded lines inside getAll’s returned Promise object. Then, we’ll start with instantiating AWS.DynamoDB.DocumentClient type. This type expose methods which one of them can be used for pulling data from a DynamoDB table – the scan method. scan method takes TableName as a required parameter. We build the scan’s parameters which consist of TableName & Limit(define maximum number of returned records). We assign the tableName & numberOfItems property’s values into these parameters. Next, we call the documentClient instance’s scan method and pass the params as its argument. When the call is finished, the callback in the method’s 2nd argument is triggered. Inside the callback method, we check whether the calling process is ended as giving error or result. Should it is ended as error (err is not null), we call the promise’s reject method and takes the err object as its argument. Otherwise, we call resolve method and takes the result (data) as its argument.

Testing the changes in local development machine
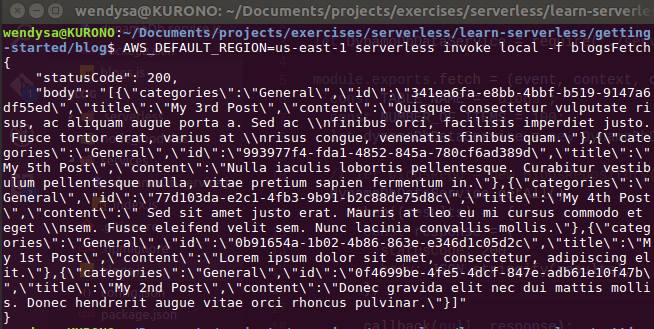
- At this point, we should be ready to test our changes. Before we deploy our code to AWS, it’s good thing to do if we test it first in our local machine. As usual, to do this, we will invoke this command to invoke the service, AWS_DEFAULT_REGION=<AWS Region of where your lambda sits on> serverless invoke local -f <lambda function’s name> . In our case, we will invoke the command as AWS_DEFAULT_REGION=us-east-1 serverless invoke local -f blogsFetch
- Invoke the command and confirm that we got the result with status code is 200 and the body contains stringified retrieved data, came from our AWS DynamoDB’s table.
Deploy to AWS and testing it on API Gateway test page
- All should be still fine. It’s time for uploading our changed Lambda function to AWS. This time, instead of running serverless deploy -s dev -r <aws-region> command, we call this command for deploying only the Lambda code only (node.js code): serverless deploy -f <function’s name> -s <stage> -r <region>.We use this command because we don’t want to rebuild other resources such as the DynamoDB when deploying our updated Lambda code.

- Although it was working fine when we tested our lambda in local environment, we still need to test the deployed Lambda function. This time, instead of using Postman for testing our API, we will do it in different way. We are going to test it through using API Gateway’s Test Page. Go back to our AWS Console page then go to AWS API Gateway service page. On the page, click Resources link in left menu. Then on Resources pane, click the GET verb. On right pane, click a Blinking Dot with label TEST link. This will bring the API Test page when we clicked it.

- Confirm that the right pane is refreshed and display the test page. On the page, there is blue coloured with thunder icon button, the test button. Click this button. This will invoke our blogs/fetch API.

- When the call is finished, we received “Internal server error”. We will cover how we are going to fixing these issues.

- On the displayed Logs, we could not find any useful information which explains why the error happened. To look for what was going on and the cause of this error, we could see it on CloudWatch Logs window. Open the Cloud Watch page then click Logs item on left menu. Confirm that the right pane refresh and display a list of Log Group item. Click the item whose name is matched to our blogs/lambda service.

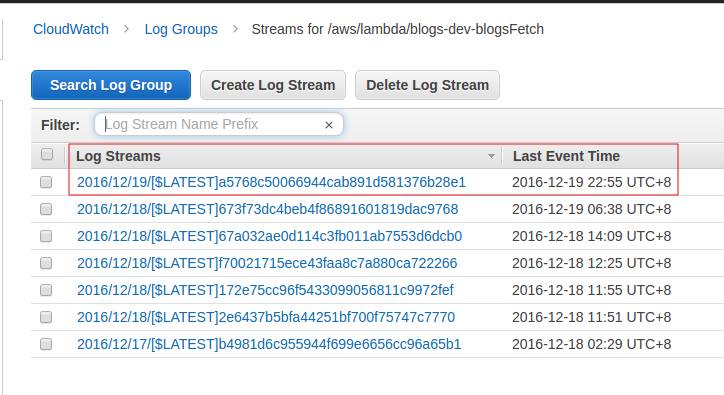
- When we clicked one of displayed Log Groups item, the right pane is refreshed again and displays a list of Log Streams. Click the one with latest Last Event Time.
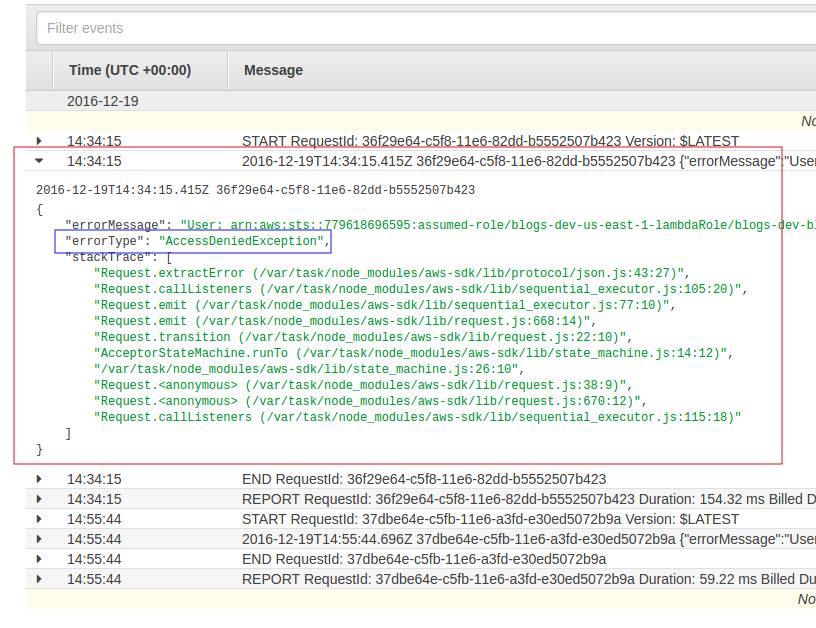
- In the next page, expand the item that looks like explain this error. Notice the errorMessage & errorType, it seems that we have not authorise the Lambda Function to do Scan operation against the designated DynanmoDB table.
Fixing the unauthorised access error
- To fix the previous error, we need to give authorisation access to our Lambda function for performing scan operation against the DynamoDB Table. The way to do this is by adding DynamoDBIamPolicy entry in the serverless.yml file, under Resources entry as follow:

- Save the changed serverless.yml file and then re-run the serverless deploy -f <function’s name> -s <stage> -r <region> command again.
Retesting the Lambda on API Gateway test page
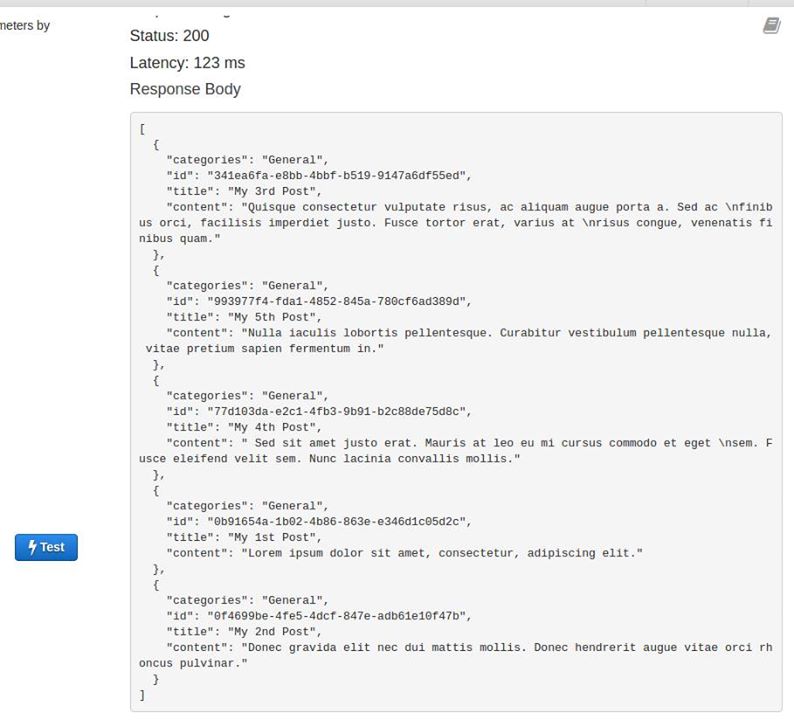
- Once we have redployed our lambda function, go back to AWS Web Console’s API Gateway Test page of our deployed Lambda function. Then, press the Test button. Noticed that we do not receive error anymore. Instead, we should see records from DynamoDB Blogs table are retrieved and displayed as follow.
Conclusion
At the end of this article, we have learned a number of key things to get our Lambda function able to pull data from AWS DynamoDB. First, we define the DynamoDB table we want to create through adding Resources section in serverless.yml file. Once we redeployed our Lambda to AWS, AWS CloudFormation will create the DynamoDB Table, beside our Lambda function & its API Gateway endpoint. Then, we filled the created table with several items through AWS DynamoDB Web Console.
On the Lambda function’s handler code, we structured our code by moving retrieveBlogs method into an ES6 class (the DynamoDbDataService class) and wrap the method’s body with ES6 Promise (because we want the records retrieval to be an asynchronous process). Then, we replaced the hardcoded lines with logic for Initialising AWS SDK’s Document Client class and calling its scan method for retrieving records from Blogs table.
Aside from these, we learned how to get the detailed error log in case a request to our deployed Lambda’s endpoints return “Internal Server Error”,through looking at AWS CloudWatch web page. We also learned that the API Gateway page has a section that allow us to Test our Lambda’s HTTP Endpoint.The source code of this article can be found in this link.
In the next article, we will add more verbs on the Lambda function so that it would provide complete CRUD endpoints.
